Raspberry Pi Printer Server, Scanner Server and Media Center

First of all, sorry for posting this in english. Hopefully, I’ll post this in portuguese too. I chose english as this might be interesting to a wide community of raspberry pi users out there.

So what’s this all about? Really, it’s about making good use of an extremely cheap, low powered computer that I got at Codebits last year. I actually replaced a $600 mac mini I had doing all these things before.

My goal was to have a reliable Media Center that could connect to a NAS device (I use Synology DS1511) and play all my videos, photos and MP3.

Also, at home we all have a computer and we all need to print or scan something every once in a while. I could have bought a network printer and scanner but instead I already owned an old Canon Inkjet printer, the PIXMA MP630 which has been doing it’s job quite well for years. As it happens, this is a multifunction device and works as a scanner too. What follows is a recipe to have everything working.

You’ll need a 4GB SD card and a Mac to start the procedure. Everything else is done on the Raspberry Pi.

You should have some knowledge of working “with black windows full of letters” as my daughter says.

1. Install raspbmc

Raspbmc is a debian wheezy distribution optimized for XBMC Media Center. There are some others but for some reason I like this one. Any other debian based should work though.

Open a terminal window on your mac, insert the SD card on a card reader and run these:

$ curl -O http://svn.stmlabs.com/svn/raspbmc/testing/installers/python/install.py
$ chmod +x install.py
$ sudo python install.py

Now follow the on screen instructions.

2. Boot raspbmc on your Raspberry Pi

Insert the card on the Raspberry pi. It will boot and complete the installation. Grab a coffee 🙂

Go ahead and play a bit with XBMC. It’s great. And if you have one of those TVs that support CEC then you can even use your TV remote to navigate on XBMC. I know for a fact that Samsung and Sony TVs work quite well.

3. Log on to your Raspberry Pi

Open your terminal and run this:

$ ssh [email protected]

it will prompt you for a password. Raspbmc uses the default password “raspberry”. I advise you to change it just in case.
Take some time choosing your locale and time zone settings. It will only prompt you once for these.

4. Update your installation

The network installation of Raspbmc you just did will probably download all the latest packages. However, just to be sure, run these commands:

$ sudo apt-get update
$ sudo apt-get upgrade

5. Now it’s time to setup the printer server.

$ sudo apt-get install cups (Grab a coffee. This will take a while)

$ sudo usermod -a -G lpadmin pi

We’re adding user “pi” to the lpadmin group. You’ll need admin access to add printers.

Now edit cupsd configuration:

$ sudo vi /etc/cups/cupsd.conf

And change Listem localhost:631 to Listen *:631.

Also change or add the following lines. Replace 192.168.1.* with the IP addresses of your network. My network is 192.168.1.0/24

Listen *:631

<Location />
Order allow,deny
Allow 192.168.1.*
</Location>

<Location /printers>
Order allow,deny
Allow 192.168.1.*
</Location>

# Restrict access to the admin pages…
<Location /admin>
Order allow,deny
Allow 192.168.1.*
</Location>

We’re telling cups which IPs in the network have access to. If you trust your network and if you’re sure there’s no access from outside, you can skip editing the file and just enter:

$ sudo cupsctl –remote-admin

$ sudo cupsctl –remote-any

Now you have to restart CUPS

$ sudo /etc/init.d/cups restart

Please note the IP address of your Raspberry Pi. You’ll need it later

$ ifconfig eth0  | grep “inet addr” | awk -F: ‘{print $2}’ | awk ‘{print $1}’

6. Add your printer

On your mac, grab a browser and point it to your Raspberry Pi’s IP on port 631. Mine is on 192.168.1.169, so…

https://192.168.1.169:631

Don’t worry about the certificate warning. It’s self signed so your browser will rightfully warn you about it.

Now click on Administration and then on Add Printer

You should be prompted with a user and password. Of course, use “pi” as the user and “raspberry” as the password (or whatever new password you chose)

You should see a list of local printers. Mine was listed as “Canon MP630 series (Canon MP630 series)”

Press continue, review the information and make sure you check “Share this printer”

Choose a make and model and finally add the printer.
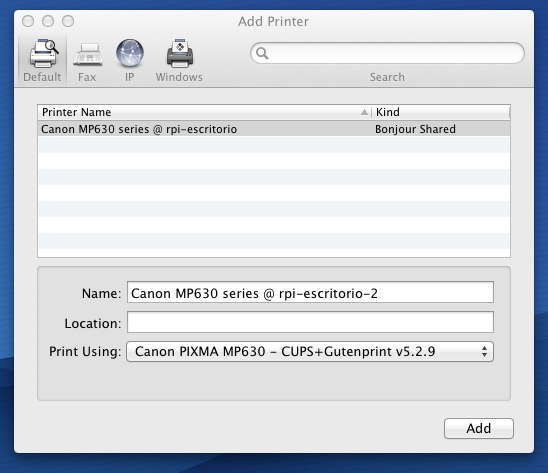
7. Add your new network printer on OSX

This is where I’ve seen most people make a mistake so beware. When you add this printer under OSX, the default driver is postscript based. This means the Mac will send a postscript file back to the CUPS server. Now the server has to convert postscript to whatever the printer understands. This is bad. This conversion is both memory and cpu consuming. Printing a page would take up to 10 minutes if you use these settings.

What I did was: I installed the correct driver on OSX as if I had the printer connected locally and used that driver. This means that all processing is done by my computer and the Raspberry Pi only has to forward it to the printer.

In my case, I installed CanonPrinterDrivers from Apple and chose MP 630 Series driver on the printer add dialog.

Printing done! Go ahead and print a few documents. It’s fast and has almost no impact on the Raspberry. I actually had a video playing without problems.

8. Now for the scanner.

While installing CUPS you also installed SANE. So everything should be in place.

To be sure, run this command:

$ scanimage -L
device `pixma:04A9172E_145C70′ is a CANON Canon PIXMA MP630 multi-function peripheral

So, SANE identified my device correctly. Actually, if I try:

$ scanimage –format=tiff > ~/myimage.tiff

It works.

But now we need to tell SANE who is allowed to scan from the network.

Grab your editor:

$ sudo vi /etc/sane.d/saned.conf

And simply add this line

192.168.1.0/24

Again, change it to match your network. This means that every IP from 192.168.1.1 to 192.168.1.255 will be able to use the scanner.

Now make sure SANE starts by default. You need to edit another file:

$ sudo vi /etc/default/saned

And change this line to yes

RUN=yes

9 Setup your scanner client under OSX

Now, unfortunatelly, Apple has been shooting itself in the foot as far as network scanning is concerned. With the latest versions (I tried 10.7 and 10.8) you can’t make your scanner appear under “Image Capture”. However, with a few tweaks you can make things work.

First, you need to install SANE Backends for OSX. There’s a nice port here: http://www.ellert.se/twain-sane/

Install libusb and SANE Backends, SANE Preferences Pane in this order

Now you must tell your mac where to search for the scanner.

Edit this file:

$ vi /usr/local/etc/sane.d/net.conf

And add your Raspberry Pi’s IP right at the end.

In my case, 192.168.1.169

Now go ahead and see if your mac recognizes the network scanner:

$ scanimage -L
device `net:192.168.1.169:pixma:04A9172E_145C70′ is a CANON Canon PIXMA MP630 multi-function peripheral

There! If you’re a command-line fan, you can simply use “scanimage”

If you prefer a gui to scanimage, download “snac” from here http://www.wallner.nu/fredrik/software/snac/

It’s just a GUI frontend to scanimage but it allows you to scan and save the picture.

I hope this is useful to somebody.

Cheers.


Comments

31 responses to “Raspberry Pi Printer Server, Scanner Server and Media Center”

  1. Thank a lot for the tutorial !!

  2. jmarin Avatar
    jmarin

    Excellent post thanks.
    I have a question regarding how to add the printer in OSX, what protocol are you usign IPP, LDP, Socket, can you post a screenshot of the printer added because I have the following configuration and it doesn’t work http://screencast.com/t/cTaN3yUKrk I get this message after press “Add” http://screencast.com/t/pPdFEngHV

    Thanks again.

  3. The network installation of Raspbmc you just did will probably download all the latest packages . However , just to be sure , run these commands:

    $ sudo apt-get update
    $ sudo apt-get upgrade “
    This kills raspbmc . Don’t do it .

  4. Hi, your printer should show up on the default tab providing it’s running avahi-daemon/bonjour.

    For this to happen, both the mac and the pi must have an IP address within the same network. In my case, 192.168.1.*/24

    Here’s my “add printer” tab http://cloud.poingg.com/Skitch/Add_Printer-20130503-213906.jpg

  5. Hi, what do you mean “kills raspbmc”?

    This distro uses this package repository
    deb http://archive.raspbian.org/raspbian wheezy main contrib non-free

    apt-get upgrade will simply upgrade all outdated packages. Actually, xbmc is there too.

  6. Ethan Avatar
    Ethan

    Hi! Great tutorial indeed!

    I’ve been using my raspberry pi as the print server for a while. And I followed your guide to set it up as a scan server as well.

    However, after I’ve added my Pi’s IP on my Mac (in my case, its 192.168.1.119), and did “scanimage -L” but bash returned as “No scanners were identified”.

    My Mac could only detact the scanner if I plug in the USB cable.

    I’m on 10.9.1

    Any advices?

  7. Hi Ethan, thank you for your comments.
    I take it you installed SANE backends for OSX right?

    Can you please tell me the contents of /usr/local/etc/sane.d/net.conf on your mac?

  8. Ethan Avatar
    Ethan

    Hi Eduardo,

    Here’s the screenshot of my net.conf

    http://postimg.org/image/6q1z61zht/

    In case if you can’t open the link,

    # This is the net backend config file.

    ## net backend options
    # Timeout for the initial connection to saned. This will prevent the backend
    # from blocking for several minutes trying to connect to an unresponsive
    # saned host (network outage, host down, …). Value in seconds.
    # connect_timeout = 60

    ## saned hosts
    # Each line names a host to attach to.
    # If you list “localhost” then your backends can be accessed either
    # directly or through the net backend. Going through the net backend
    # may be necessary to access devices that need special privileges.
    # localhost
    192.168.1.119

  9. Hi Ethan,

    Everything seems fine with your conf file so the problem must be somewhere in the raspberry Pi installation.

    What happens if you run “scanimage -L” on the raspberry?

  10. Ethan Avatar
    Ethan

    Hi Eduardo,

    If I ‘scanimage -L’ on Pi, it could detect my scanner.

    device `pixma:04A91734′ is a CANON Canon PIXMA MP190 multi-function peripheral

  11. Pagocs Avatar
    Pagocs

    Hello Eduardo,

    Thank you for this excellent tutorial.

    I followed your description but unfortunately have same issue like Ethan.

    So I am also curious about the possible solution.

    Regards,

  12. Hi Ethan and Pagocs

    I have just ran this on Mavericks as I thought there could be some issue with 10.9.1 but it all worked fine.

    Let’s do some troubleshooting…

    1st. Let’s make sure “saned” is running on the Pi.
    Log on to the Pi and enter

    $ sudo netstat -ltunap | grep saned

    You should get a line similar to this one:
    tcp 0 0 0.0.0.0:6566 0.0.0.0:* LISTEN 2214/saned

    which means saned is running and listening on port 6566 on any IP on the Pi

    If you don’t, then saned is not running and listening on the proper port.

    Now on the mac try:

    $ telnet IP_of_your_Pi 6566

    In my setup:
    telnet 192.168.1.169 6566

    And make sure you got a “Connected to … ” reply.
    If you don’t, then something is blocking tcp connections on that port to your raspberry Pi

  13. pagocs Avatar
    pagocs

    Hello Eduardo,

    Thank you for your help, I found the mistake. I am shame with this sane… 🙂 So in my case I wrote the yes with uppercase accidentally in the config file and the daemon not started…

    So currently looks like the saned is working

    $ scanimage -L
    device `net:192.168.1.205:pixma:04A91712′ is a CANON Canon PIXMA MP530 multi-function peripheral

    but when I try scanning remotely I got the following error:

    $ scanimage –format=jpg > ~/Desktop/testscan.jpg
    scanimage: open of device net:192.168.1.205:pixma:04A91712 failed: Access to resource has been denied

    the result is same if I try just test the scanner

    $ scanimage -T
    scanimage: open of device net:192.168.1.205:pixma:04A91712 failed: Access to resource has been denied

    Regards,

  14. Hi pagocs

    Probably you missed this on the raspberry pi:

    $ sudo vi /etc/sane.d/saned.conf

    And simply add this line
    192.168.1.0/24

    This states that any device with an IP 192.168.1.* (your mac should have one of these) has access to saned running on the pi.

    If you have some other IP and are accessing the PI with different routing options, then simply replace that entry with the full IP address for your mac.

  15. pagocs Avatar
    pagocs

    Unfortunately no, I already added the necessary IP range during the setup. The part of the config file look like the following:

    ….
    ## Access list
    # A list of host names, IP addresses or IP subnets (CIDR notation) that
    # are permitted to use local SANE devices. IPv6 addresses must be enclosed
    # in brackets, and should always be specified in their compressed form.
    #
    # The hostname matching is not case-sensitive.

    #scan-client.somedomain.firm
    #192.168.0.1
    #192.168.0.1/29
    #[2001:7a8:185e::42:12]
    #[2001:7a8:185e::42:12]/64

    192.168.1.0/24

    …..

  16. pagocs Avatar
    pagocs

    I found this thread: http://www.raspberrypi.org/phpBB3/viewtopic.php?f=28&t=50694

    Adding the pi user to the scanner group not solved the problem, but chmod did. But I looking for the real solution…

  17. kriza Avatar
    kriza

    same problem here.

    scanimage -L on RPI identifies scanner
    scanimage -L on Mac “no devices found”

    everything is configured regarding your post … libusb, sane backend, sane preferences pane installed, IP address of my rpi is in net.conf

    thanks for help.

  18. I just followed every instruction on my post once again.
    Here’s my current setup:

    iMac running 10.9.1
    Raspberry Pi running Raspbmc
    Canon Printer PIXMA MP630 connected via USB to the Raspberry Pi

    I ran everything from start including cups setup and…

    imac3:~ eep$ scanimage -L
    device `pixma:04A9172E_145C70′ is a CANON Canon PIXMA MP630 multi-function peripheral

    A couple more suggestions:

    I’m posting my conf files on the link below. They represent the full path on the mac and on the raspberry pi.
    https://meocloud.pt/link/517ab169-45d7-414a-978d-dc6e0acd0464/rpi-scanner/

    Also, take a look at this link and make sure your scanner model is listed.
    http://www.sane-project.org/sane-mfgs.html#SCANNERS

    Finally, try this:
    On the Raspberry Pi:
    $ lsusb

    Look for the device ID for your scanner. It’s made up of two identifiers separated by “:” and look under /etc/saned.d/* on the Raspberry PI searching for the vendorID and productID on your scanner’s brand file

    If it’s not there you may try to add it yourself but there’s no guarantee that it will work. It should identify it at least.

    Another tool you may try to run while debugging on the Raspberry Pi is
    $ sane-find-scanner

    Other than this I really don’t know how I can help you more. Sorry

  19. kriza Avatar
    kriza

    hello, thanks for your help.
    unfortunately i have my HP listed under supported devices
    http://www.sane-project.org/cgi-bin/driver.pl?manu=Hewlett+Packard&model=&bus=any

    and i do not have problem on my RPi – there is scanner and i can scan via cmd line just fine, it’s just Mac problem that from there it showing no scanners whatsoever.
    So maybe my Mac cant find remote scanner or just is not properly communicating with rpi, but i dont have clue why.

    maybe: when i change anything in any conf file, do i have to restart some services?

    Thanks

  20. kriza Avatar
    kriza

    pi@raspbmc:~$ scanimage -L
    device `hpaio:/usb/PSC_2350_series?serial=MY4AUF40GTKJ’ is a Hewlett-Packard PSC_2350_series all-in-one

    MacBookPro:~ kriza$ scanimage -L

    No scanners were identified. If you were expecting something different,
    check that the scanner is plugged in, turned on and detected by the
    sane-find-scanner tool (if appropriate). Please read the documentation
    which came with this software (README, FAQ, manpages).

    i do have IP of my rpi added to /usr/local/sane.d/net.conf
    🙁

  21. Hi, I got the below error whilst installing cups on RASBMC

    errors were encountered while processing:
    nfs-common
    E: Sub-process /usr/bin/dpkg returned an error code (1)

    Can this be ignored?
    Thanks in anticipation.
    Daz.

  22. Ethan Avatar
    Ethan

    Hi Eduardo & Kriza,

    Sorry that I was away from this. Actually what happend to me was that I put RUN=YES (YES in caps) instead of RUN=yes. After I changed it, my mac could detect the scanner over the IP.

    Hope this helps.

    With regards,
    Ethan

  23. hi,
    I’m really inspired by your article so if you don’t mind I’m going to post a link to here in my post. I hope that is ok. I’m writing a series of articles on Raspberry Pi.

  24. MrDak Avatar
    MrDak

    Hi:

    I followed the tutorial, but i can’t print from my mac if i Put the right driver in the box (i have to use the autoselected Cups). If i selected the Cups works ok, just a little bit slow the print process.

    What could be the problem (Using Epson Artisan 50 with Raspberry and Mac os X Mavericks.

  25. kriza Avatar
    kriza

    hi there,
    so little update (but i cant still get it work right).

    my problem is (was) that saned was not running even /etc/init.d/saned start isnt working
    so i googled a little and found xinetd.d approach when you add saned-daemon file into /etc/xinetd.d with this content

    service sane-port
    {
    socket_type = stream
    server = /usr/sbin/saned
    protocol = tcp
    user = saned
    group = saned
    wait = no
    disable = no
    }

    this one is able to start saned for me…. but 🙂
    by xinetd.d it starts as two proceses
    saned 2014 0.0 0.1 2892 572 ? Ss 15:23 0:00 /usr/sbin/saned -a saned
    saned 2015 0.2 0.2 2892 836 ? S 15:23 0:00 /usr/sbin/saned -a saned

    which i figured out is problem when i run saned debuger

    pi@raspbmc:~$ saned -d128
    [saned] main: starting debug mode (level 128)
    [saned] read_config: searching for config file
    [saned] read_config: done reading config
    [saned] saned (AF-indep+IPv6) from sane-backends 1.0.22 starting up
    [saned] do_bindings: trying to get port for service “sane-port” (getaddrinfo)
    [saned] do_bindings: [1] socket () using IPv6
    [saned] do_bindings: [1] setsockopt ()
    [saned] do_bindings: [1] bind () to port 6566
    [saned] do_bindings: [1] bind failed: Address already in use
    [saned] do_bindings: [0] socket () using IPv4
    [saned] do_bindings: [0] setsockopt ()
    [saned] do_bindings: [0] bind () to port 6566
    [saned] do_bindings: [0] bind failed: Address already in use
    [saned] do_bindings: couldn’t bind an address. Exiting.
    [saned] FATAL ERROR; bailing out, waiting for children…
    [saned] bail_out: all children exited

    in this case my mac is unable to reach saned so it calls “no scanners….”

    but if i shut down two processes saned and run saned debuger again:

    pi@raspbmc:~$ saned -d128
    [saned] main: starting debug mode (level 128)
    [saned] read_config: searching for config file
    [saned] read_config: done reading config
    [saned] saned (AF-indep+IPv6) from sane-backends 1.0.22 starting up
    [saned] do_bindings: trying to get port for service “sane-port” (getaddrinfo)
    [saned] do_bindings: [1] socket () using IPv6
    [saned] do_bindings: [1] setsockopt ()
    [saned] do_bindings: [1] bind () to port 6566
    [saned] do_bindings: [1] listen ()
    [saned] do_bindings: [0] socket () using IPv4
    [saned] do_bindings: [0] setsockopt ()
    [saned] do_bindings: [0] bind () to port 6566
    [saned] do_bindings: [0] bind failed: Address already in use
    [saned] run_standalone: spawning Avahi process
    [saned] run_standalone: waiting for control connection
    [saned] saned_avahi_callback: AVAHI_CLIENT_S_RUNNING
    [saned] saned_create_avahi_services: adding service ‘saned’
    [saned] saned_avahi_group_callback: service ‘saned’ successfully established

    and if i now run scanimage on mac, everything is ok and working.

    so my problem is for sure at raspbmc side or bad saned daemon which runs two processes which makes problem with address binding.

    but from here i dont know what to do 🙁

    any help appreciated!


    i had RUN=yes but process wont start anyway

  26. kriza Avatar
    kriza

    hello,
    little update if i hit /etc/init.d/saned start with sudo its working, otherwise its not and sane is not running

    so i have to figure out where is problem in permissions during boot sequence …

  27. kriza Avatar
    kriza

    but besides that, if sane is running (two processes) i still cant scan from mac. so problem is still here 🙂

  28. great article about raspberry
    can you answer me something did i install windows on raspberry

  29. For printing, since you are rendering on the mac you need not install CUPS at all. Infact you only need p910nd and your server can be a a directjet protocol printer. In the case you present because it is a multifinction ypu may HAVE to install the driver,

    The advantage of p910nd is that it is passthrough. I have even streamed HD videos on a RPi wile printing from another computer through the Pi

  30. I think there is a CUPS option for “Host Based Rendering” not mentioned here that needs to be set correctly. The default for CUPS is to render on the server

  31. Good Day I Am So Happy I Found Your Website, I
    Found You By Mistake, While I Was Searching On Aol For
    Something Else, Anyhow I Am Here Now And Would Just Like To Say Many Thanks For
    A Remarkable Post And An All Round Entertaining Blog
    I Don’t Have Time To Read It, All At The Moment But I Have BookMarked It
    And Also Added In Your RSS Feeds, So When I Have Time I Will Be Back To Read More,
    Please Do Keep Up The Fantastic Job.

Leave a Reply

Your email address will not be published. Required fields are marked *